Thoughts on Building Fluent API
“Who was that shape in the shadows?
Whose is the face in the mask?”
— The Phantom of the Opera
The original idea comes from here: How to Create a Fluent API in C#. Thanks for the inspiration! 😄
Prologue
As a developer, you may already heard of the concept of Fluent API. No? Let me show you some examples.
As a C# developer, you must be familiar with LINQ. It is really an elegant way of filtering data.
1 | OrdersList.Where(o => o.Amount > 1000 && o.Date >= DateTime.Now.AddDays(-5)) |
Or, if you’re a Java player, you may use Stream API like this.
1 | cars.stream().filter(car -> car.kilometers < 50000) |
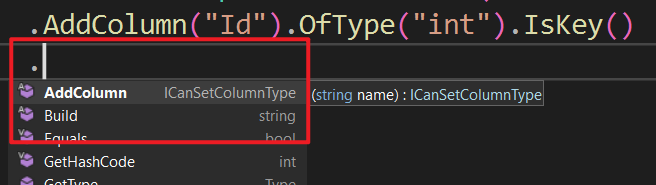
Fluent API not only provide seamless programming experience, but also friendly for code suggestion or completion, as users can see and only see the available methods they can use.
Fluent API works just, fluently. So how to create a Fluent API of your own? 🤔
In this post, I’m going to show the mechanism behind Fluent API, and provide you with a demo.
1. Behind the Fluent API
First of all, we have to ask ourself a question: How does the Fluent API work?
Let’s think about it. Of course, we must be able to chain the method call, which can be simply done by returning the instance itself. However, after each call, the next method varies. 🧐
Does it ring a bell? I believe you are close to its secret. That’s it, automata! The chained call is actually traversing on an automata! 😆 Each method will return a state in the automata, and each state can call different methods leading to state transition.
Now we know the theory behind this, let’s get to a demo to implement this idea. I’ll show you the basic design of Fluent API, and a trick to make it even more fluent. 😉
All code in this post is available on GitHub.
2. Getting Fluent
Code for this part is under folder Basic in project FluentApiDemo. Corresponding test class is BasicTest.
Now, think of a situation when you need to build a table using SQL. You may need to manually write the SQL string like below, and use string concatenation to join them piece by piece.
1 | CREATE TABLE `Demo`.`DemoTable` ( |
In case you are not familiar with it, you can refer to this post for the basic syntax of creating a table using SQL: SQL - CREATE Table.
This is one of the best scenario to use Fluent API, to build a structured object. So let’s go through the complete process to create a SQL table builder with Fluent API.
1.1 Constructing the Automata
It is vital to analyze the calling relations when we try to build Fluent API, because that’s what makes Fluent API fluent. And it would be even better if you can draw the corresponding automata.
To create a table using SQL, roughly you need these information.
- Name of the table.
- Name of the database you want to put this table.
- Columns in the table, and each column has name, type, whether is key or is required.
In the properties above, except for the key and nullable properties, all information is required. So we can draft our automata like this. The node represents a state of the builder, and the edge represents a method call. We start from Initial, and finally go to End after a series of calls.

The edges labeled ε means the state can transfer without calling any method. For example, after we call OfType(), we can directly call Build() or AddColumn(), instead of calling IsKey() or IsRequired().
Isn’t it clear when we have the automata? 😏 Now let’s implement it.
Actually, there is one flaw in this preliminary automata I presented you here, have you found it?
1.2 Creating the Interfaces
Now it’s time to convert the automata to actual code. Here I’m going to use C# as example, but the other object-oriented language should work just the same.
To get start, you should have a basic thoughts of your implementation. Each node in the automata should be an interface, with its out edges as methods. And for each method, its return value should be the interface its edge points to.
As for interfaces connected by ε edges, it means that, the interface at the start of the ε edge can call methods of the interface at the end.
With these in mind, we need 5 interfaces, and each can be defined as follows.
1 | public interface ICanSetDatabase |
Note the use of inheritance here. When ε edge encountered, you don’t need to write the method again in another interface. Instead, you can simply inherit them.
1.3 Implementing the Interfaces
The implementation shows the interface magic again. We just need a class that implements all these interfaces, and all the self reference returned will be recognized as corresponding interfaces, and limit the user access for the methods.
So, we can create a BasicTableDescriptor like this. The approach is not one and only. It’s just a demo. 🙂
1 | public class BasicTableDescriptor : |
Now, you can write code like this to generate a SQL statement.
1 | string sql = BasicTableDescriptor.CreateTable("ValidTable").InDatabase("Demo") |
And it will output the following SQL.
1 | CREATE TABLE `Demo`.`ValidTable` ( |
Tada! 🎉 Your API is fluent now! 😁
1.4 Limitation
If you looked into the implementation I’ve presented above, you may notice one problem, which I mentioned in 1.1. That is when we trying to build the SQL without adding any column, it will throw an exception!
1 | BasicTableDescriptor.CreateTable("InvalidTable").InDatabase("Demo").Build(); |
Users can only know this via documentation, or see the exception thrown with their own 👀. This is bad, because it will make our Fluent API not fluent. 🥲
So how can we prevent it from even happening?
3. Becoming More Fluent
Code for this part is under folder Advanced in project FluentApiDemo. Corresponding test class is AdvancedTest.
In this part I’m going to introduce to you a simple way of dealing with the number of calls in Fluent API. Which mean some method can only be access after a certain number of calls for a method.
3.1 Updating the Automata
To make Build() not available before the first AddColumn() is called, the most simple modification we can come up with is adding those steps before Build(). And the automata will then be like this.

We simply duplicated some interfaces to achieve the goal, and it looks good. But in this case, we’ll have 9 interfaces! 🫢 Do we really need so many nodes? The answer is, no.
3.2 Finite Automata
Here it requires some more knowledge on automata. The one we have now is a NFA (Non-deterministic Finite Automata). It can be determined as a DFA (Deterministic Finite Automata) and minimized. However, as we don’t really use program to traverse it, there’s no need for determination. But we still need basic minimization to reduce our work.
So… just look at it, and figure it out… 😳 There are some tricks, though. To be specific, there are three steps.
- Pick two interfaces (nodes), check their incoming edges and outgoing edges.
- If both the incoming and outgoing edges match (exact match, number and names), then you MAYBE able to merge them into one.
- Repeat step 1 and 2, until the automata is simple enough.
After these steps, you may get a minimized NFA like this. There’s only one more interface added, the purple one.

3.3 More Fluent Descriptor
With an added state, we need to modify the return value of InDatabase(), and add an interface representing the purple node.
1 | public interface ICanSetDatabase |
But it will introduce another problem - naming conflict. If we inherit all these interfaces like we did before, you’ll find that AddColumn() will be defined both in ICanAddColumnFirst and ICanAddColumn with the same parameter and return value, but they should have different behavior! 😩
If we cannot define them in one class, then why not in two? We can split our automata into two, and each implements a subset of our interfaces.

Note that we will silently transfer to another class instance in the first AddColumn method, and all states should be preserved. So, we can create the following two classes. (Forget about the poor naming. 😭)
1 | public class AdvancedTableDescriptor : |
The other parts are the same, and you can go to its repo on GitHub for the detailed implementation.
Tada! 🎉 Now, the invalid call won’t even pass compilation. 😁
1 | AdvancedTableDescriptor.CreateTable("InvalidTable") |
Epilogue
Although it requires some tricks to implement a Fluent API, the most important thing is to know how users use your interface. Remember that the Fluent API is only fluent when the calling logic is straight forward and easily understood.
Now the secret is revealed, enjoy your own Fluent API! ᓚᘏᗢ
 WeChat


